torchvision의 fasterrcnn_resnet50_fpn을 이용하여 객체 탐지를 해보겠습니다.
객체 탐지에 대한 내용은 이곳을 확인해 주세요.
torchvision은 파이토치에서 제공하는 데이터셋과 모델 패키지입니다.
fasterrcnn_resnet50_fpn은 말 그대로 ResNet50 기반의 Faster R-CNN 입니다.
fasterrcnn_resnet50_fpn은 pre-trained model이기 때문에 따로 학습할 필요가 없습니다.
predictions의 boxes는 x, y, w, h 좌표이며 labels은 class index 값입니다. (0, 1, 2, ...)
마지막으로 scores는 probability으로, 기본적으로 값이 높은 순으로 정렬된 값을 얻을 수 있습니다.
위에 언급한것처럼 labels 값이 정수(index)이므로 String으로 변경할 필요가 있습니다.
class index는 COCO 데이터 기반이기 때문에 coco.names 파일이 필요합니다.
검색으로 다운로드 받아도 되고, 아래 내용을 복사하여 파일을 생성하면 됩니다.
[coco.names]
person
bicycle
car
motorbike
aeroplane
bus
train
truck
boat
traffic light
fire hydrant
stop sign
parking meter
bench
bird
cat
dog
horse
sheep
cow
elephant
bear
zebra
giraffe
backpack
umbrella
handbag
tie
suitcase
frisbee
skis
snowboard
sports ball
kite
baseball bat
baseball glove
skateboard
surfboard
tennis racket
bottle
wine glass
cup
fork
knife
spoon
bowl
banana
apple
sandwich
orange
broccoli
carrot
hot dog
pizza
donut
cake
chair
sofa
pottedplant
bed
diningtable
toilet
tvmonitor
laptop
mouse
remote
keyboard
cell phone
microwave
oven
toaster
sink
refrigerator
book
clock
vase
scissors
teddy bear
hair drier
toothbrush
coco.names 파일을 기반으로 decode list를 만듭니다.이후 fasterrcnn_resnet50_fpn 모델의 출력(boxes, labels)을 원본 이미지에 적용합니다.이 때, Confidence threshold는 0.8로 설정했습니다. 마지막으로 원본 이미지와 객체 탐지 정보를 반영한 이미지를 붙여 확인합니다.
아래는 전체 코드입니다.
[faster_rcnn.py]
from torchvision.models.detection import fasterrcnn_resnet50_fpn
from torchvision.transforms import functional as F
from PIL import Image
import cv2
import numpy as np

# Load the pre-trained Faster R-CNN model
model = fasterrcnn_resnet50_fpn(pretrained=True)
model.eval()

# Load and preprocess the input image
image_path = 'image.jpg'
image = Image.open(image_path)
image_tensor = F.to_tensor(image)

# Perform inference with the Faster R-CNN model
predictions = model([image_tensor])

# Process the predictions
boxes = predictions[0]['boxes'].tolist()
labels = predictions[0]['labels'].tolist()
scores = predictions[0]['scores'].tolist()
# print(labels)
# for i in scores:
#     print(i)

# Load the COCO class labels and create the label decode
labels_decode = []
with open('coco.names') as f:
    labels_decode = f.readlines()
    labels_decode = [decode.rstrip('\n') for decode in labels_decode]

# Load the original image using OpenCV for visualization
image_origin = cv2.imread(image_path)
image_detection = image_origin.copy()

# Display the bounding boxes, labels, and scores on the original image
for box, label, score in zip(boxes, labels, scores):
    if score > 0.8:
        try:
            name = labels_decode[label - 1]
            box = [int(coord) for coord in box]
            x, y, w, h = box
            cv2.rectangle(image_detection, (x, y), (w, h), (0, 255, 0), 2)
            cv2.putText(image_detection, f'{name}', (x, y - 10), cv2.FONT_HERSHEY_SIMPLEX, 0.5, (0, 255, 0), 2)
        except IndexError:
            pass

# Display the image with bounding boxes and labels
cv2.putText(image_origin, f'Origin', (0, 25), cv2.FONT_HERSHEY_SIMPLEX, 0.8, (0, 0, 255), 2)
cv2.putText(image_detection, f'Detection', (0, 25), cv2.FONT_HERSHEY_SIMPLEX, 0.8, (0, 0, 255), 2)
results = np.hstack((image_origin, image_detection))
cv2.imshow('Object Detection', results)
cv2.waitKey(0)
cv2.destroyAllWindows()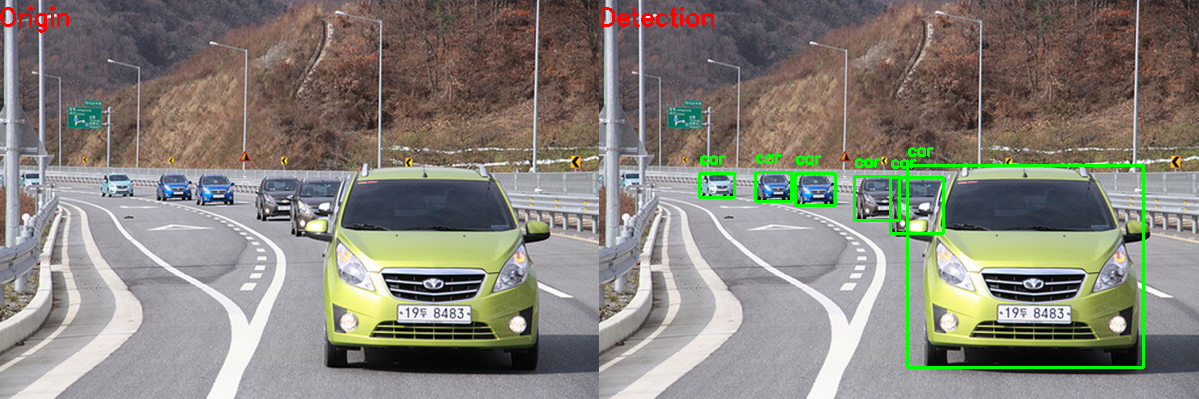
'AI > TensorFlow & PyTorch' 카테고리의 다른 글
| [PyTorch] Mask R-CNN을 이용한 인스턴스 분할 (0) | 2023.07.11 |
|---|---|
| [PyTorch] FCN을 이용한 시맨틱 분할 (0) | 2023.07.11 |
| [TensorFlow] InceptionV3을 이용한 이미지 검색 (0) | 2023.06.19 |
| [PyTorch] CNNs을 이용한 이미지 분류 (1) | 2023.06.15 |
| [TensorFlow] CNNs을 이용한 이미지 분류 (0) | 2023.06.15 |